There were quite a few of us spending time in the NQFY "tavern crawl" and we became friends. When it came time at the end of April for us to put our names in the Sorting Hat, I really wasn't sure I could pick a House (more on that in my Hufflepuff post).
Well, off the grid the other NQFYs decided to set up a place where we could still continue to chat outside the walls of Hogwarts. There, I was invited to participate in a hexipuff swap with Karigenknights and Sumiregusa.
Just one problem: all the hexipuffs (from the fabled Beekeeper's Quilt) I'd ever seen were knitted from sock yarn.
Well, none of my local chain stores sell 'sock yarn'. And if they did, it's too expensive for me to invest in. (I also don't knit, but that's an aside.)
This is where the 'poor girl' part comes in.
I took worsted weight super saver yarn and un-plied it.
Two strands instead of four.
And then I set out to modify the Apiary Puff pattern to match the 3" wide by 3" tall dimensions Sumiregusa was kind enough to give me.
What follows here is what worked for me; I hope others find it helpful!
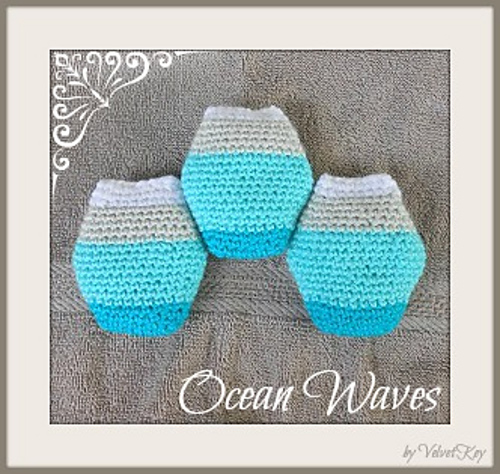
The trio of hexipuffs I turned in for Charms, HPKCHC May 2015.
Poor Girl's Crochet Hexipuff
Supplies
- D-hook (3.25mm)
- 12 yards of worsted weight yarn, unplied into two pieces (2-ply each, 24 yds. total)
- yarn needle
- small amount of fiberfill
- stitch marker
Instructions
This pattern is worked in continuous rounds, not joined rounds. You will move your stitch marker up with each round.
Chain 9.
Row 1: Sc in 2nd ch from hook and place stitch marker. Sc to end (8). Continue to sc on backside of chain for a total of 16 sc.
Row 2: Sc in marked st; move marker. 2sc in next st (increase), sc in next 5, 2sc in next, 1 sc, 2sc in next, sc in next 5, 2sc in last st before marker (20).
Row 3: Sc in marked st; move marker. Sc in each st around (20).
Row 4: Sc in marked st; move marker. 2sc in next st, sc in next 7, 2sc in next, 1 sc, 2sc in next, sc in next 7, 2sc in last st before marker (24).
Row 5: Sc in marked st; move marker. Sc in each st around (24).
Row 6: Sc in marked st; remove marker. Sc once more and place marker (adjusting for stitch shift). 2 sc in next st, sc in next 9, 2sc in next, 1 sc, 2sc in next, sc in next 9, 2 sc in last st before marker (28).
Row 7: Sc in marked st; move marker. Sc in each st around (28).
Row 8: Sc in marked st; remove marker. Sc once more and place marker (adjusting for stitch shift). 2sc in next st, sc in next 11, 2sc in next, 1 sc, 2sc in next, sc in next 11, 2 sc in last st before marker (32).
Row 9: Sc in marked st, move marker. Sc in each st around (32).
Row 10: Sc in marked st, move marker. 2 sc in next st, sc in next 13, 2sc in next, 1 sc, 2sc in next, sc in next 13, 2sc in last st before marker (36).
Row 11: Sc in marked st, move marker. Sc in each st around (36). Now you'll start decreasing.
Row 12: Sc in marked st; remove marker. Sc once more and place marker (adjusting for stitch shift). Sc2tog , sc in next 13, sc2tog, 1 sc, sc2tog, sc in next 13, sc2tog in last st before marker (32).
Row 13: Sc in marked st, move marker. Sc in each st around (32).
Row 14: Sc in marked st, move marker. Sc2tog, sc in next 11, sc2tog, 1 sc, sc2tog, sc in next 11, sc2tog in last st before marker (28).
Row 15: Sc in marked st, move marker. Sc in each st around (28).
Row 16: Sc in marked st; remove marker. Sc once more and place marker (adjusting for stitch shift). Sc2tog, sc in next 9, sc2tog, 1 sc, sc2tog, sc in next 9, sc2tog in last st before marker (24).
Row 17: Sc in marked st, move marker. Sc in each st around (24).
Row18: Sc in marked st, move marker. Sc2tog, sc in next 7, sc2tog, 1 sc, sc2tog, sc in next 7, sc2tog in last st before marker (20).
Row 19: Sc in marked st, move marker. Sc in each st around (20).
Row 20: Sc in marked st; remove marker. Sc once more and place marker (adjusting for stitch shift). Sc2tog, sc in next 5, sc2tog, 1 sc, sc2tog, sc in next 5, sc2tog in last st before marker (16).
Stuff with a small amount of fiberfill.
At this point, you may choose to either sew the hexipuff closed, or slip stitch it shut. Weave in ends and you're done!
Ta da! Way to go on using up those worsted remnants!
Wow! Thank you so much for this pattern. I wanted to knit it. I am more experienced with crochet. Do you happen to know how many hexipuffs it will take to make the quilt?
ReplyDeleteHi, I actually do not know, as I've never made an entire quilt. I'm betting the answer totally depends on what size bed you're making it for (or couch, etc.). You could try going to Ravelry.com and checking people's project notes on the original Beekeeper pattern. :)
DeleteIs there any way you could do a video? I learn so much easier by seeing that reading the directions. Help!!
ReplyDelete