One of the places to visit is Ollivander's Wand shop. There are badges available for taking the wand quiz on Pottermore, crafting your own wand from an Instructable...and of course, making your wand out of yarn!
Well.
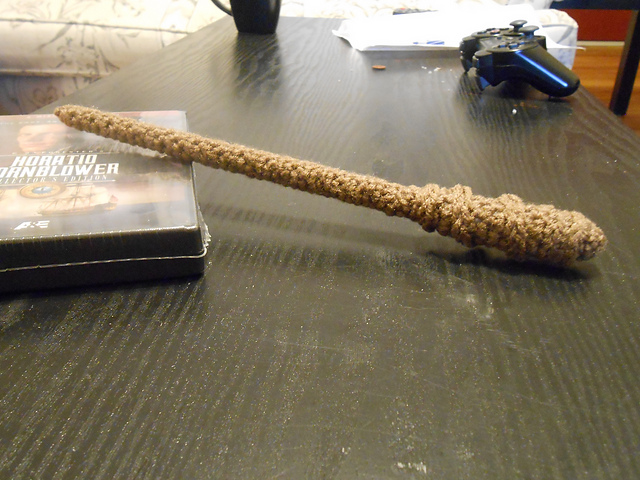
I may have decided to make my own pattern for a wand. Here's the finished product:
Forgive the quality; the lighting in my house is awful at night.
Disclaimer: This pattern is untested, highly improvised, and utilizes amigurumi techniques. Caution and common sense is advised!
Ollivander's Wand
Supplies
- chopstick, wooden skewer (anything that could be the core structure of a wand)
- small amount of worsted weight yarn in desired brown color
- 3.75mm (F) hook, 5.00mm (H) hook
- yarn needle
- handful of stuffing
- a dash of magic!
Instructions
This pattern is amigurumi (meaning continuous rounds, not joined rounds) and worked in two parts: the handle and the shaft.
(It's also my very first amigurumi pattern and I made the wand as I wrote this pattern.)
Handle (Begin with F hook.)
Rnd 1: Sc 6 into magic ring OR ch 2 and sc 6 into first ch. (6)
Rnd 2: Sc around. (6)
Rnd 3: Sc 2 in each st. (12)
Rnd 4: FLO sl st in each st (12)
Note: You will be working in back loop in the next round; when you begin Rnd. 4 you might want to put a stitch marker in the back loop to help you easily identify it for Rnd. 5.
Rnd 5: Sc in BLO (in the unused back loop from the sc's in Rnd 3). (12)
Note: Begin to stuff bottom of handle lightly; enough of a cushion for your chopstick to sit on.
Rnd 6: *Decrease in BLO, sc in next 2. Repeat from * twice. (9)
Rnd 7-17: Sc around to form the grip of the handle (9).
Note: Continue with rounds until grip is long enough for you.
Rnd 18-20: Sl st in FLO. (9) Cut yarn, but do not weave in end yet.
Note: Time to stuff! Insert the chopstick into the handle. Take small amounts of stuffing and pat them into strips (or roll them). With the handle of your F-hook, tamp the stuffing strips down evenly, winding them around the core, until you are satisfied.
Weave in the end with your yarn needle.
Shaft (Begin with F hook.)
Note: Leave an 8" long tail at your slip knot.
Rnd 1: Sc 4 into magic ring OR ch 4 and join to first ch with a sl st. Sc 4 in the loop you just made.
Note: Do not tighten the magic ring or the loop closed! This will slip over the end of the chopstick and sit right on top of the handle.
Rnd 2-22: Sc around in each stitch.
Note: Continue until shaft is long enough to cover the rest of the chopstick.
Rnd 3: Sc2tog, sl st. Cut yarn and sew open end into whatever point is desired. FO and weave in end.
Using tail from Rnd 1, sew shaft to handle. Weave in end.
Optional Vine Detail for Handle (Begin with H hook.)
Ch a 6-8" chain, with a 10-12" tail. Cut yarn and knot. Place one end at base of handle and wrap around in desired pattern. Use yarn needle and the 10-12" tail to tack the vine into place as desired. FO and weave in all ends.
Expelliarmus!
Please make any suggestions to me about this pattern; it's free and you may share it as such. Per copyright, however, please do not sell these as "Harry Potter" wands or anything. Let's not get me in to trouble! Give them as gifts, and if people ask, tell them where you found the pattern!
Here are the badges I earned for my wand:
My results from Pottermore:
Length: 13 3/4 inches
Wood: Hornbeam
Core: Unicorn
Flexibility: Surprisingly swishy
Wood: Hornbeam
Core: Unicorn
Flexibility: Surprisingly swishy
For making my wand of yarn!
And for laughing at my own cleverness in achieving
another written pattern (almost) on my own!


No comments:
Post a Comment