Showing posts with label Mojang. Show all posts

Sunday, July 3, 2016

HPKCHC End of Winter 2016 Term - Throwback

Hey happy crafters!

I promised to sum up the end of the Winter 2016 festivities over at the Hogwarts Knitting and Crochet Cup, and my goal was to Craft All The Things — that is, something for each and every prompt.

My previous posts covered all my classes (and when I remembered, Detention!).

Now to the heavy hitters, like my multi-month projects...

OWL Exam - Astronomy (Option 3) - Pattern Writing  (200 points)

I designed and wrote patterns for two bags, one of which has already been published here as the Reversible Minecraft Monster Bag.


And now, for the first time ever, I am pleased to present a Through the Keyhole Exclusive Pattern:

A Customizeable Minecraft Bag!


This pattern is fanart, please use it as such and don't violate the Mojang and Microsoft guidelines.

And my shiny new Astronomy OWL badge:


Order of the Phoenix Mission/BROOM  (100 points)

I proposed to vanish at least 1,000 yards of yarn in the making of foot-warmers (and at least one pair had to be socks!).  I made 4 pairs of various things:


The ruffled booties are for sale in my Etsy store as of this post!

This marks my third term of successful Double Advanced Studies!

Taking into account my Quidditch total from the last post, I earned 134 points for all rounds.

Headmistress' Challenge - 2 parts

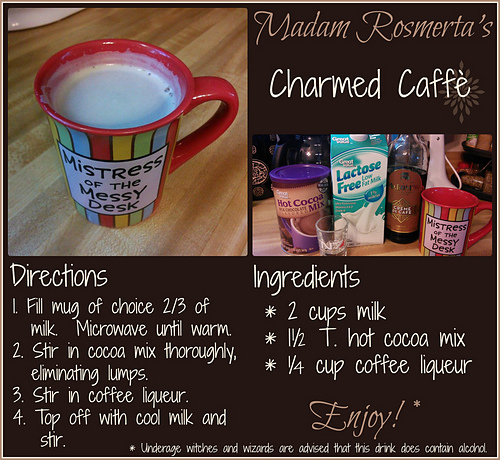
First: Make Her a Drink

Second: Help Shovel the Walk

A fine morning to you, Headmistress!
As you can see, I have crafted this excellent Muggle hat for shoveling the walk today. The Muggles call it a ‘sun hat’ which I thought was ever so clever—you see, if you bring a lawn chair and a fishing pole and something called a ‘cooler’ with you, you can simply sit down anywhere with this hat on and the sun will just come out!
I think this is brilliant, Headmistress. The benefit of melting the snow while you sit and fiddle with this fishing pole contraption? Priceless!
Although…I do wonder what Muggles do with these poles. Likewise the cooler…I was supposed to fill it with ice, I think. And some strange kind of ‘beer’ but all we had was butter beer and of course the beverage prompt was last month so I thought I could do without that bit…
But the sun-summoning hat! Yes, I think it will work quite nicely, don’t you?
…what do you mean ‘keep the sun out of my eyes’? Sun hats are supposed to summon the sun so it will melt the snow and I won’t have to shovel at all.
No?
Well, nargles. Guess I better fetch a shovel.


Total points achieved = 32 points.

And then of course there were the classes. January = 164 points, February = 178 points, and March = 183 points. Total: 525 points.

Grand Total: 991 points to Hufflepuff!

So, I didn't make it to 1,000 points as I did in my past two terms...but I DID Do All The Things.

Ravenclaw again took the House Cup, but...

We took back the Quidditch Cup!

All in all, a fabulous term!

Now I am at the end of the middle month of my fourth term (Spring 2016) and I can't wait to share all the new projects and patterns and things I've discovered along the way!

Stay tuned, and craft on!

Tuesday, July 28, 2015

Minecraft Enderman Pattern

This project was a long time in the making:


Although the enderman may be constructed in the same manner as my Creeper pattern, I chose to do it differently, primarily due to the awfully long limbs on this guy.  I'll share what I did, and maybe you'll find it useful, too!

The finished height of this plushie is 44" tall when his feet touch the floor.

Minecraft Enderman

Supplies
  • 1,000 yards of black yarn
  • 10 yards of light purple yarn (I used Red Heart Orchid)
  • 5 yards of dark purple yarn (I used Red Heart Amethyst)
  • 2-3 lbs. approx. fiberfill
  • 4.00mm (G) hook
  • yarn needle
  • lots of patience
Instructions

An enderman (just like a creeper) has six body parts: four (4) limbs, one (1) body, and one (1) head.  You will make the body and head in two panels each.  You will make the limbs as three panels each.

(Apologies in advance for no photos--my camera has mysteriously been lost in Z-space.)

Limbs (Panel 1)  Make eight (8).

With black yarn, chain 7.

Row 1:  Sc in 2nd ch from hook, sc in each across. (6)

Row 2-6: Ch 1, turn.  Sc across. (6)

Cut yarn and knot off.

(Yes, this is the easiest part of the entire project.)


Limbs  (Panel 2)  Make four (4).

With black yarn, chain 91.

Row 1:  Sc in 2nd ch from hook, sc in each across. (90)

Row 2-24:  Ch 1, turn.  Sc across. (90)

Do not cut yarn.  Turn Panel 2 to work on the short edge.Take one Panel 1 square and seam it with sc to the short edge of Panel 2 (it will form the end of one limb, with 6 sc's per side of Panel 1).

When you reach the beginning of the seam, turn the piece inside-out and match the long edges together (so the seam you just made is now inside what will become the enderman's arm/leg).  Sc down the length of the arm/leg.  Leave a 24" yarn tail and cut yarn.  Knot off for now.

The piece is inside-out (long, and very unwieldy).  This is the tricky part: turning it right-side out while stuffing at the same time.

Take the closed end of the limb and turn it right-side out by working it back through the center of the tube.  Stuff as you go--every 2-3 inches.  I tended to stuff the ends of the limbs a little firmer, so they would hold shape, and the middles of the limbs softer so they could bend easily (and they wouldn't be as heavy).

You will continually slide the outer part of the inside-out leg up as you stuff, while working the inner, right-side-out part down. (I tend to think of it like putting on a pair of long socks--you slide your foot down the center of the sock, while your hands pull the sock up around your calf.)

Once the limb is stuffed the way you like it, thread the 24" tail through your yarn needle.  Sew another Panel 1 to the top, and then you can use the remaining tail to stitch the limb to the body.

(Yes, you have to do this four times.  Yikes!)


Body  (Panel 1)  Make one (1).

With black yarn, chain 25.

Row 1: Sc in 2nd ch from hook; sc across in each st. (24)

Rows 2-36: Ch 1, turn.  Sc across. (24)

Row 37:  Ch 1, turn.  Sc in BLO across. (24)   (This creates a faux seam.)

Rows 38-48: Ch 1, turn.  Sc across (24).

Row 49:  Ch 1, turn.  Sc in BLO across. (24)

Rows 50-84:  Ch 1, turn.  Sc across. (24)

Cut yarn and knot off.


Body (Panel 2) Make one (1).

With black yarn, chain 13.

Row 1:  Sc in 2nd ch from hook; sc across in each st. (12)

Rows 2-36:  Ch 1, turn.  Sc across. (12)

Row 37:  Ch 1, turn.  Sc in BLO across. (12)

Rows 38-60:  Ch 1, turn.  Sc across. (12)

Row 61:  Ch 1, turn.  Sc in BLO across. (12)

Rows 62-96: Ch 1, turn.  Sc across. (12).

Do not cut yarn.  

Time to seam. Pull final loop larger and remove hook in order to practice lining up the panels.  Take each and fit them around each other to make a box.

Crochet through both panels with single crochet.  This very long seam will close up the entire chest.

Note:  You may choose to sc an extra stitch at the corners to make them more defined.  I've done it both ways, and have no preference.

Remember not to seam the last seam closed before stuffing the chest.  

Stuff the chest firmly (it needs to be able to support the head), and finish sc'ing the last seam.  Cut yarn and weave in end securely with yarn needle.


Head  (Panel 1)  Make one (1).

With black yarn, chain 25.

Row 1:  Sc in 2nd ch from hook; sc across in each st. (24)

Rows 2-24:  Ch 1, turn. Sc across. (24)

Row 25:  Ch 1, turn.  Sc in BLO across. (24)

Rows 26-48:  Ch 1, turn.  Sc across. (24)

Row 49:  Ch 1 turn.  Sc in BLO across (24)

Rows 50-72:  Ch 1, turn.  Sc across. (24)

Cut yarn and knot off.


Head  (Panel 2)  Make one (1).

With black yarn, chain 25.

Row 1: Sc in 2nd ch from hook; sc across in each st. (24)

Rows 2-24:  Ch 1, turn.  Sc across. (24)

Row 25:  Ch 1, turn.  Sc in BLO across. (24)

Rows 26-48: Ch 1, turn.  Sc across. (24)

Row 49:  Ch 1, turn.  Sc in BLO across. (24)

Rows 50-56: Ch 1, turn.  Sc across. (24)

Now begins the eye detail with the two shades of purple.  You will use the color change method below to change colors.  I will describe how it is done the first time, but when CC (color change) is noted, it is always going to be the same process of finishing the final SC with the new color.

Row 57:  Ch 1, turn.  Sc across in first 23 st.  For 24th st, CC at end of st.

Note:  You are changing color to orchid (the lighter purple) on stitch 24.  With black, begin the 24th sc by inserting hook into stitch, yarn over, pull loop through.  Take your lighter purple yarn and yarn over, pull through to complete stitch 24.  The tails of your yarn should be on the side of the panel without ridged faux seams.  You can cut the black yarn, leaving a 1-1.5" tail.

Rows 58-60:  Ch 1, turn.  Sc in first 2 st.  CC to your amethyst (your dark purple) at the end of the 3rd st.

Note:  You will change color to dark purple on stitch 3.  With light purple, begin the 3rd sc by inserting hook into stitch, yarn over, pull loop through.  Take dark purple yarn and yarn over, pull through to complete stitch 3.  The tails of your yarn should be on the side of the panel without ridged faux seams.

Rows 58-60 (continued):  Continue with dark purple for the next 3 st.  CC to light purple at the end of the 3rd st.
Continue with light purple for the next 3 st, CC to black at the end of the 3rd st.
Continue with black for the next 5 st, CC to light purple at the end of the 6th st.
Continue with light purple for the next 3 st, CC to dark purple at the end of the 3rd st.
Continue with dark purple for the next 3 st, CC to light purple at the end of the 3rd st.
Continue with light purple for the next 3 st, CC to black at the end of the 3rd st.  (24)

You have just done the enderman's eyes.

Rows 61-72:  Ch 1, turn.  Sc across. (24)

Note:  Make sure to tie off any loose yarn ends so that the face will not unravel.

Time to seam!  Pull final loop larger and remove hook in order to line up the panels.  Take both panels and fit them around each other to make a box.

Place your hook back into your final loop, and crochet through both panels with single crochet.

Stuff the head, remembering to pack the corners well for a well-defined box shape, and finish sc'ing the last seam.  Cut yarn and weave in end securely with yarn needle.


Attaching the Limbs

Legs:  Arrange two limbs on the bottom front seam of the enderman's chest, 3-4" apart.  Sew one edge of enderman's limb to the bottom front seam.  Knot yarn and weave ends in securely.

This resulting "hinged" attachment allows the enderman to "sit" on the bottom of his chest naturally.

Note:  I know that's not how the enderman looks in Minecraft, but I find that if you were to attach the legs to the center bottom of the chest piece, then he wouldn't sit very well and your seams would strain.

Arms:  Take the other two limbs and sew one on each side of the top side seams of the chest (again, making a "hinged" attachment.  Knot yarn and weave in ends securely.

Head:  Stitch head to chest with yarn needle and black yarn.  I used a single, center seam (middle of head to middle of the top of the chest), but this does cause the head to 'nod'.  For a more fixed head, sew using the top front and rear seams of the chest.

Ta da!

A complete set of my plushie pattern works!

And as always: Microsoft is suing people selling Minecraft things online.  Don't get me in trouble.  This is a free pattern.  Utilize it properly and be responsible with it.

Once again, nerdy crafters:  Craft On!

Thursday, June 11, 2015

Minecraft Creeper Pattern

When I signed up to sit my Potions OWL (in the Harry Potter challenge), I was told to add a little something extra on to make it a 3-month project.

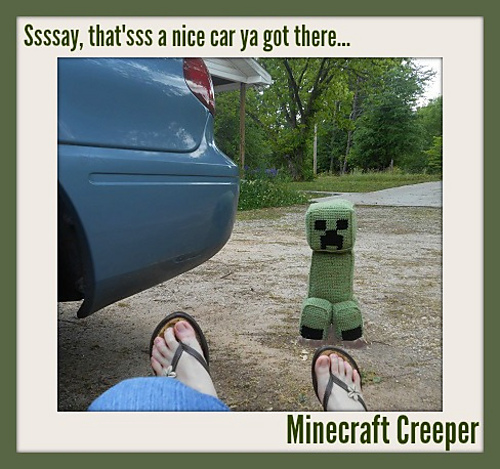
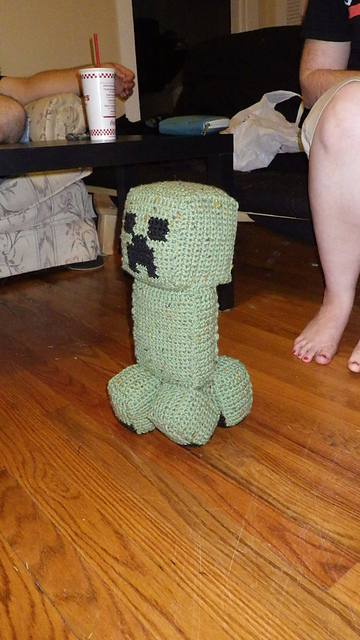
I decided to add a Minecraft creeper, and bonus:  I get to share my pattern with all of you!  Check this bad boy out:

Yes, that is literally his size next to my car.

This creeper stands at 21" tall, and is made to scale with my Minecraft people plushies, and the one enderman plushie:

The enderman is 44" tall, and his pattern is coming in a future post.

Minecraft Creeper

Supplies
  • 600 yards of green/green varigated (I used Hobby Lobby's I Love This Yarn: Sagey Tweed)
  • 20 yards of black yarn
  • 2.5 lbs. approx. of fiberfill
  • 4.0mm (G) hook
  • yarn needle
  • scissors
Instructions

A creeper has six body parts: four (4) feet, one (1) body, and one (1) head.  Each body part will be worked as two (2) panels.  They will then be seamed together using single crochet.

(I am going to apologize in advance for not having pictures available at this time.)

Feet (Panel 1)  Make four (4).

With green yarn, chain 13.

Row 1:  Sc in 2nd ch from hook; sc across in each st. (12 sc)

Rows 2-18: Ch 1, turn.  Sc across. (12)

Row 19:  Ch 1, turn.  Sc in BLO across (12).  (This is a faux seam.)

Rows 20-30: Ch 1, turn.  Sc across. (12)

Row 31: Ch 1, turn.  Sc in BLO across. (12)

Rows 32-48: Ch 1, turn.  Sc across. (12)

Cut yarn and knot off.


Feet (Panel 2)  Make four (4).

With green yarn, chain 13.

Row 1:  Sc in 2nd ch from hook; sc across in each st. (12 sc)

Row 2-18: Ch 1, turn.  Sc across. (12)

Row 19:  Ch 1, turn.  Sc in BLO across in first 11 sc.  

Note:  You will change color to black on stitch 12.  With green, begin the final sc by inserting hook into BLO, yarn over, pull loop through.  Take black yarn and yarn over, pull through to complete stitch 12.  The tails of your yarn should be on the side of the panel without ridged faux seams.

Cut green yarn, leaving a 1-1.5" tail.  Continue with black yarn.

Rows 20-30: Ch 1, turn.  Sc across. (12)

Row 31: Ch 1, turn.  Sc in BLO across. (12)

Rows 32-36: Ch 1, turn.  Sc across. (12)

Note: You will change color to green on the last stitch of Row 36.  With black, begin the final sc by inserting hook as normal.  Yarn over, pull loop through.  Take green yarn and yarn over, pull through to complete stitch 12.  The tails of your yarn should be on the same side of the panel as the other tails (the side without ridged faux seams).

Cut black yarn, leaving a 1-1.5" tail.  Continue with green yarn.

Rows 37-48: Ch 1, turn.  Sc across. (12)

Do not cut yarn.  Tie your color change tails together on the wrong side.

Time to seam!  Pull final loop larger and remove hook in order to practice lining up the panels.  Take one foot panel of each (Panel 1 and Panel 2) and fit them around each other to make a box.  If you're having trouble envisioning what I mean do the following:

Lay your Panel 2 horizontally, wrong side up (your tails and knots will show).

Lay your Panel 1 vertically, right side up on top of Panel 2.   (Yes, they will be a plus sign.)

The two smaller, square center portions of each panel should be on top of each other.  This is the top and bottom of the foot.  The longer portions of the panels are the sides of the foot.

Fold Panel 2's sides up and pin them to Panel 1, if desired.  Fold Panel 1's sides down and pin them to Panel 2, if desired.  Now you should have a box shape.

Place your hook back into your final loop, and crochet through both panels with single crochet.  This very long seam will close up the entire foot.

Note:  You may choose to sc an extra stitch at the corners to make them more defined.  I've done it both ways, and have no preference.

Be careful not to seam the last seam closed before stuffing the foot.  

Stuff the foot firmly (remember, the creeper has to stand on it), and finish sc'ing the last seam.  When stuffing, make sure to poke stuffing into each corner to give it a boxy shape.  Cut yarn and weave in end securely with yarn needle.


Body (Panel 1) Make one (1).

With green, chain 25.

Row 1: Sc in 2nd ch from hook; sc across in each st. (24)

Rows 2-36: Ch 1, turn.  Sc across. (24)

Row 37:  Ch 1, turn.  Sc in BLO across. (24)

Rows 38-48: Ch 1, turn.  Sc across (24).

Row 49:  Ch 1, turn.  Sc in BLO across. (24)

Rows 50-84:  Ch 1, turn.  Sc across. (24)

Cut yarn and knot off.


Body (Panel 2) Make one (1).

With green, chain 13.

Row 1:  Sc in 2nd ch from hook; sc across in each st. (12)

Rows 2-36:  Ch 1, turn.  Sc across. (12)

Row 37:  Ch 1, turn.  Sc in BLO across. (12)

Rows 38-60:  Ch 1, turn.  Sc across. (12)

Row 61:  Ch 1, turn.  Sc in BLO across. (12)

Rows 62-96: Ch 1, turn.  Sc across. (12).

Do not cut yarn.  

Time to seam again. Pull final loop larger and remove hook in order to practice lining up the panels.  Take each and fit them around each other to make a box, as described above at the end of the foot section.


Crochet through both panels with single crochet.  This very long seam will close up the entire chest.

Note:  You may choose to sc an extra stitch at the corners to make them more defined.  I've done it both ways, and have no preference.

Remember not to seam the last seam closed before stuffing the chest.  

Stuff the chest firmly (it needs to be able to support the head), and finish sc'ing the last seam.  Cut yarn and weave in end securely with yarn needle.


Head (Panel 1) Make one (1).

With green, chain 25.

Row 1:  Sc in 2nd ch from hook; sc across in each st. (24)

Rows 2-24:  Ch 1, turn. Sc across. (24)

Row 25:  Ch 1, turn.  Sc in BLO across. (24)

Rows 26-48:  Ch 1, turn.  Sc across. (24)

Row 49:  Ch 1 turn.  Sc in BLO across (24)

Rows 50-72:  Ch 1, turn.  Sc across. (24)

Cut yarn and knot off.


Head (Panel 2)  Make one (1).

With green, chain 25.

Row 1: Sc in 2nd ch from hook; sc across in each st. (24)

Rows 2-24:  Ch 1, turn.  Sc across. (24)

Row 25:  Ch 1, turn.  Sc in BLO across. (24)

Rows 26-48: Ch 1, turn.  Sc across. (24)

Row 49:  Ch 1, turn.  Sc in BLO across. (24)

Rows 50-54: Ch 1, turn.  Sc across. (24)

Now begins the face detail with black.  You will use the color change method above to change colors.  I will describe how it is done the first few times, but when CC (color change) is noted, it is always going to be the same process of finishing the final SC with the new color.

Rows 55-60:  Ch 1, turn.  Sc in first 2 st.  CC at the end of the 3rd st.

Note:  You will change color to black on stitch 3.  With green, begin the 3rd sc by inserting hook into stitch, yarn over, pull loop through.  Take black yarn and yarn over, pull through to complete stitch 3.  The tails of your yarn should be on the side of the panel without ridged faux seams.

Rows 55-60 (continued):  Continue with black for the next 5 st.  CC to green at the end of the 6th st. Continue with green for the next 5 st, CC to black at the end of the 6th st.
Continue with black for the next 5 st, CC to green at the end of the 6th st.
Continue with green for the next 3 st.  (24)

You have just done the creeper's eyes.

Rows 61-63:  Ch 1, turn.  Sc in first 8 st; CC at the end of the 9th st.
Continue with black for the next 5 st; CC to green at the end of the 6th st.
Continue with green for the next 9 st.  (24)

Rows 64-69:  Ch 1, turn. Sc in first 5 st; CC at the end of the 6th st.
Continue with black for the next 11 st; CC to green at the end of the 12th st.
Continue with green for the next 6 st. (24)

Rows 70-72:  Ch 1, turn.  Sc in first 5 st; CC at the end of the 6th st.
Continue with black for the next 2 st; CC to green at the end of the 3rd st.
Continue with green for the next 5 st; CC to black at the end of the 6th st.
Continue with black for the next 2 st; CC to green at the end of the 3rd st.
Continue with green for the next 6 st. (24)

Note:  Make sure to tie off any loose yarn ends so that the face will not unravel.

Time to seam!  Pull final loop larger and remove hook in order to line up the panels.  Take both panels and fit them around each other to make a box.

Place your hook back into your final loop, and crochet through both panels with single crochet.

Stuff the head, remembering to pack the corners well for a well-defined box shape, and finish sc'ing the last seam.  Cut yarn and weave in end securely with yarn needle.


Attaching the Limbs

Back Feet:  Arrange two feet side-by-side and sew the top front seam to the bottom rear seam of the chest.  His little black "toes" will be facing forward, almost beneath the chest.  Knot yarn and weave in ends securely.

Note:  I usually cut a 24" piece of green yarn and sew all the way across both feet, since they are side-by-side.

Front Feet:  Take the other two feet and sew the top rear seam to the bottom front seam of the chest.  Knot yarn and weave in ends securely.

If all of your black "toes" are not facing the same direction, then refer to picture below.


Head:  Stitch head to chest with yarn needle and green yarn.  I usually stitch the head to the body all the way around, so that the head won't wobble.  (This only works because the creeper has no arms to attach at the shoulder.)  Weave in all ends securely.

Ta da!

Creeper's gonna creep.

And since it must be said somewhere, I'll say it here: Microsoft is suing people selling Minecraft things online.  Don't get me in trouble.  This is a free pattern.  Utilize it properly and be responsible with it.

Thanks, fellow crafters!  'Til next time, craft on!

Thursday, July 3, 2014

Minecraft News of Note: Bunnies!

Mike the coworker sent me an email this morning with the attached link to the Minecraft forums.

At first, I couldn't understand what the image was supposed to be.  Clearly something resembling a rabbit, but what's with the derpy face?

Other comments have indicated that this is the 1/1000 chance
dangerous rabbit mob known as
The Killer Rabbit of Caerbannog.

Yes, a Monty Python reference.

Here's the image I cropped to post on Facebook of a normal rabbit:

A little more gray, and a white underbelly, and he'd be MacGyver.

Obviously, I don't mean the Richard Dean Anderson 'MacGyver'.

I mean:

Left to Right:  Pipkin, MacGyver, and Phoenix

In a brief side note, there is a particular appearance (like a Dutch rabbit) that appears if you use a nametag on a rabbit and name it Toast.  It's in honor of a particular rabbit, once owned by (I assume) a famous player's girlfriend, now departed.

I decided to tweet Mojang and let them know that other previous rabbit owners (such as myself) appreciated the new creatures (and all the new items and crafting recipes, too):


And I got a reply from Axl_Rosie!


No idea if Mojang even checks the Twitter feed, but they deserve a bit of thanks for all of the updates they provide at no extra DLC cost to their millions of users!

Now in true Southern fashion: Y'all have a Happy Fourth of July and we'll see ya next week, ya hear?

XD

Wednesday, May 21, 2014

An Introduction to Minecraft Crochet

In case you have found my blog for no other reason than the Minecraft crochet I've done (whether it was the early creepers, the cake half-slab, or the character plushies from the Mindcrack server), here's how it all started!

I have been playing Minecraft since it was in beta (before wolves, meatpops, sprinting...and when the game was on sale for $16 USD).  So if I'm ever online in a public server and appear to be lost, it's probably because I've encountered (yet another!) new-to-me feature of the game and I can't figure it out.

I also enjoy reading web comics.  Particularly Looking For Group (in it's earlier days), Darths & Droids (which I am now woefully behind on), and The Knit Princess (which my bestie April introduced me to).

The Knit Princess sadly went through one too many artist changes, and I've since stopped following it.  But then either April showed me or I found something called Worsted for Wear.  Other than being about knitting (whereas I am a crocheter), it had many true-to-life references for the yarn world in general.

One of these was for a website called Ravelry.com.  I had never heard of it before, but I looked it up and was promptly floored.

It has to be the largest, most central place to find patterns for all types of crafts.  Crafters can host their patterns (for sale or for free) in the database, and all you have to do is have a free login.


There are thousands of patterns in here!

Add to that the tools like Library (where you can store patterns you've bookmarked as cool), Queue (where you can set up a list of the projects you need to do and in what order you want to do them, and Projects (where all of your completed/ongoing/hibernating projects are stored with pictures and descriptions, should you choose to add them).

Here's what my current Project page looks like:


Newly-finished projects first; older projects toward the bottom.


For awhile, I was just collecting interesting-looking free patterns.  Then I started out with hats (as evidenced by my previous two Avengers hats).

I quickly discovered a couple of other geeky patterns I wanted to try:

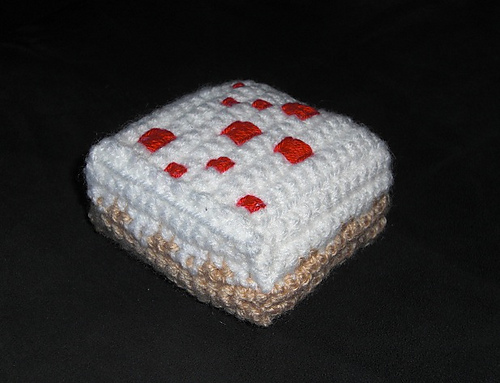
Minecraft Cake by Minke van der Zee

Minecraft Creeper (all sizes) by Minke van der Zee

But if there's one thing that I like to do to myself, it's to "improve" a pattern, even if it doesn't need it.

Let's start with the Minecraft cake.  That's a tiny cake up there; a couple of inches square.  In my mind, that was too small!  Cakes are supposed to be half-slabs (that is, half the size of a normal Minecraft block).

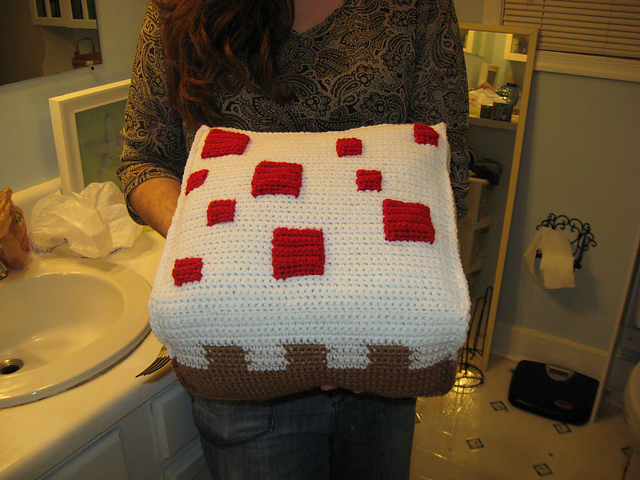
I was going to make it bigger.  (Like, three times bigger.)  The project was worked in two large rectangles, and then sewn together into it's boxy shape.

This was before I had discovered/learned/figured out how to change colors seamlessly for a better, pixel-like appearance.  Thus, my cake looked like:

If you'll look closely, you'll see how the icing edges are wavy.

Yeah, that sucker was pretty large.  I gave it as a gift to Midori for the first birthday of hers that I celebrated after becoming friends with her (we have only known each other a couple of years, and we're already thick as thieves), along with the code for her very own Minecraft account.

Would I make a cake like this again?  No.  I would make it using the new panel method I've invented for all of my current Minecraft projects, which would provide consistent seams on all six sides of the piece. 

Plus, that method would allow me to incorporate the red 'sprinkles' as a part of the panel, instead of crocheting all these tiny squares separately and then hand-sewing them on to the top of the cake (which was a pain, because I am not the neatest sewer).

Then we come to my very first creeper:

This guy looks only slightly like the pattern picture (above).

In retrospect, it would have been better had I actually looked up the appearance of a real creeper before deciding I knew better than the pattern designer.  >.>

For example, the body I made is actually square, whereas a proper creeper's body is rectangular, like in the original photo by Minke.  

On the other hand, I was able to add a little more detail, like the line of black on the front of the creeper's feet (accurate according to Minecraft pictures).

I also modified the features of the creeper, which doesn't really do it justice.  He just looks unhappy, as opposed to scarily, creepily, psychotically-stalkery unhappy.

The difference between the first creeper and a creeper done with my later method:

 
The primary differences being the body shape, and the facial features.

Needless to say, at this juncture I had a long way to go with understanding "improvements" to patterns.

So for awhile I worked on more amigurumi (crocheting in the round) projects, like the dragons in my 2013 posts.  But then, I had this strange idea of trying to apply amigurumi to a full-blown Minecraft character.

Let me preface this by saying I don't recall exactly why I chose to do PauseUnpause.  It may be because I was watching one or two of his vlogs/fanmail videos and he spoke about some of the things he'd overcome in his life; bullying, depression, etc.

Anyway, I felt for him.  And he had an address to send fanmail to, should I decide to do that.

So I started with the chest piece, working it in flat panels and sewing them together.  Yay!  I went on to the arms and legs.

But then I made the mistake of assuming that I could transfer a square pattern to a round crochet style.

Here's a hint: it didn't work.  Although, I still have the original set of limbs somewhere in my yarn stash.  T_T

So I set Pause aside.  Back to the drawing board.  Maybe his skin was too complicated?  How about somebody simpler?

Cue the VintageBeef plan.  

(Dun dun dunnnnnn....)

Tomorrow.  :D

Tuesday, May 6, 2014

The MineCon Adventure Map

So, back to how it all got started with the Broken Buttons!

As I started out on the build team, the senior builders would leave messages for me in Skype and ask me to do small paragraphs.

I wrote a few summaries for some websites concerning maps I had never seen, mentally praising my informative writing professor Dr. Spence for teaching me the value of action verbs and word limits.  Although I'd originally thought that everybody was hard at work on Kingdom of the Sky III, it seemed to be on hold.  The upcoming project was some kind of map for MineCon that featured Mindcrackers.

Doesn't sound like a big deal, right?

Or so I thought.  Here's the teaser trailer:

At 0:15 when Guude speaks, official nerd-outs began.

As it so happened, it was a map designed to showcase the entirely redesigned resource pack system, which included for the first time custom sounds.  In addition, it was the official MineCon map, and needed to have references to Mojang, the history of Minecraft, and lots of other things I had no idea about.

And they needed a script done ASAP, because they were going to distribute it on USB drives in the MineCon goodie bags, and Guude had to get it all sorted out a few weeks in advance.  The builders had to have time to finish the map, add the custom monsters and all additional redstone devices (apparently there have been significant changes in command blocks that now render all this hard work a whole lot easier) and on top of it all, debug the entire play space.

They. Were. NUTS.

And I was apparently as crazy as all the rest of them.

This time praising my choice to take Play Writing instead of Technical Writing in college, (yet cursing my short-sightedness in not also taking Script Writing), I roughed out a script format in Google Docs and shared it on the private Broken Buttons forums.

Then the mad writing began!  I took multiple tours of the different completed areas in the map, trying to fit them all into the script in their correct order, and then make that order seem logical.  I couldn't believe that the team had made these enormous, beautiful builds without knowing precisely where they were going to fit into the plot!

But that, as it turns out, is a lore writer's job.  They build it, we interpret it into the overarching story for the players.

So I worked, wrote, deleted, and wrote some more.  I tried to get the Mindcrackers into my head enough so that I could write them believable dialogue using some of their inside jokes and catch phrases.  I factored in the different quests and requirements laid out in the flow diagram and spreadsheets.  I got confused, held quick TeamSpeak conferences with some very patient builders, and then went back and rewrote entire pages.

And finally, I reached the point where I either needed to tell the builders the script was finished, or spend the next week picking over it looking for errors.

...I sent a message and took my hands off of the keyboard.  And then (of course!) I panicked.  What if it wasn't good enough?  What if I had missed something crucial?

What if the Mindcrackers hated it?

For all my years of college study, I have never had anything published by a paying publisher.  I have written a few successful fanfictions (some more than others), and I'd only submitted one short story to a publisher because I was forced to in Short Story Writing.  (And subsequently rejected, which we were all warned would happen.  I still have the rejection letter somewhere, to remind me that success doesn't happen at first.)

Thus, I am a huge critic of myself, and I fear public humiliation.

But then BTC sent us a zipped file of all the sound clips that the Mindcrackers had recorded so far.  I opened the file, and just listened.

They were saying my words.  With almost-straight faces.  My words.

(Bet you can't guess what happened next.)

Fangirl Fiesta!

It was beyond awesome!  I wanted to dance around like a moron!  (I restrained myself for the public safety of everyone I might have given black eyes to with my flailing fists.)

And then came the questions.  As it turns out, when you're the one who writes the script, that sort of makes you the authority when it comes to last-minute details.  The other builders, (particularly the redstone team) were working for hours just up until the deadline debugging, tweaking, and making sure everything ran all right.

(I even helped work on some building while I was online.  I actually designed and built most of the Museum of Mojang in the final area at the end of the game.)

Finally, finally, I thought it might be all over when the teammates attending MineCon started leaving for Orlando.  I had already sent the Pause plushie up to Washington state for Whitherunn, and he had arrived safely.

(I myself was heading north to visit my parents in New York.)  But over the weekend I watched the feeds from MineCon, checked for updates, and kept my eye on Twitter.

Perhaps my favorite moment from all of this was from Mhykol:

(To this day, I have no idea if he knew I was the lore writer on the project.)

The feeling of accomplishment was amazing.  I had finished something!  And for the most part, people liked it!  I felt like I was ready for the next project, whatever it was.

(No, you don't get a hint right now.  Check back tomorrow!)